DevEnjoy

One Step Closer

JAVA

Spring boot view template(handlebars), static resource 갱신(without server shutdown)

2017년 7월 20일 by YongPwi Leave a Comment

이전까지 spring boot를 사용시에 webapp 폴더를 임의적으로 생성하여 그 하위에 view tempate, static resource를 설정하였다.

하지만 spring boot에서 가이드하는 방식은 resources 하위에 view template과 static resource를 설정하도록 권하고 있다.

그러므로 이전의 war 방식이 아닌 jar를 가이드하고 있기 때문이기도 한듯 싶다.

최근 jar 배포용 application을 만들다 보니 기존 설정 방식을 그대로 사용해서는

문제가 좀 발생하여 수 많은 삽질을 했다.

관련 내용을 차근차근 정리해 볼까 한다.

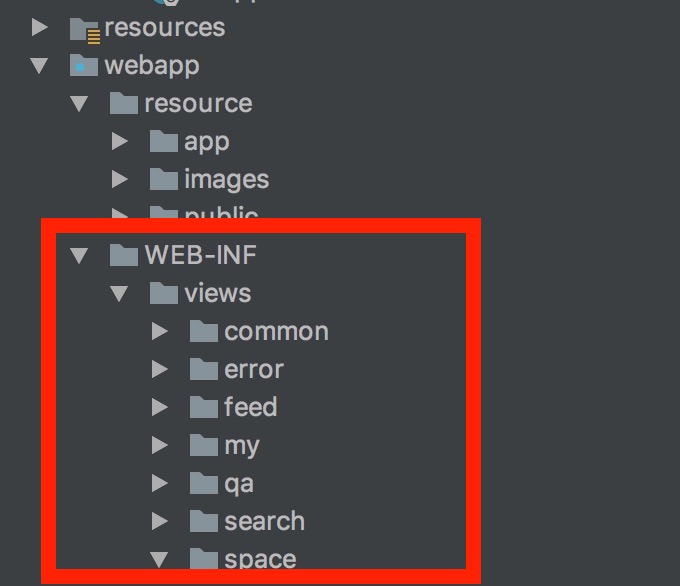
일단 jar 설정에서는 WEB-INF 하위에 view template이 존재 하지 않아서 매번 서버를 내렸다 올려야 화면 변경 내용이 확인 가능했다.

정말 미친듯이 귀찮다.

상위 방식은 기존 WEB-INF 하위에 view template 파일들이 있었지만

1
2
3
4
5
6
7
8
9
10
11
@Bean
    public HandlebarsViewResolver viewResolver() throws Exception {
        HandlebarsViewResolver viewResolver = new HandlebarsViewResolver();
        viewResolver.setOrder(1);
        viewResolver.setPrefix("/WEB-INF/views/");
        viewResolver.setSuffix(".hbs");
        viewResolver.setCache(false);
        viewResolver.registerHelpers(new HandlebarsHelper());
        viewResolver.registerHelpers(StringHelpers.class);
        return viewResolver;
    }

상위 처럼 handlebars의 경우 WebMvcConfigurerAdapter 상속받아서 상위 처럼

1
viewResolver.setCache(false);

설정하면 서버재시작 없이 브라우저 갱신하게 되면 변경 내용을 확인할 수 있었다.

하지만 jar 방식에서는 상위 방식 외에 다른 설정 방법이 필요하다.

– spring boot devtools 의존성 추가

관련 내용을 찾다보니 spring boot devtools 설정으로 해결 가능했다.

1
2
3
4
5
6
7
8
9
10
11
12
13
14
15
16
17
dependencies {
        compile('org.springframework.boot:spring-boot-starter-data-jpa')
    compile('org.springframework.boot:spring-boot-starter-jdbc')
    compile('org.springframework.boot:spring-boot-starter-security')
    compile("org.springframework.boot:spring-boot-starter-web")
    compile('com.github.jknack:handlebars-springmvc:4.0.6')
    compile('org.postgresql:postgresql:9.4-1201-jdbc41')
    compile('org.bgee.log4jdbc-log4j2:log4jdbc-log4j2-jdbc4.1:1.16')
    compile('org.projectlombok:lombok')
    testCompile('org.springframework.boot:spring-boot-starter-test')
    compile('org.codehaus.jackson:jackson-core-asl:1.9.13')
    compile('com.google.guava:guava:18.0')
    compile('org.modelmapper:modelmapper:0.7.5')

        // spring boot devtools dependency 추가
        compile("org.springframework.boot:spring-boot-devtools")
}

– spring boot 설정 변경( application.properties, application.yml )

운영 서버를 제외한 로컬 환경에만 적용하기 위하여 하위 처럼 설정한다.

1
2
3
4
5
6
7
8
9
// application.yml
spring :
     profiles: local
     devtools:
        livereload:
            enabled: true

// application.properties
spring.devtools.livereload.enabled=true

– IDE(intellij) 옵션 수정

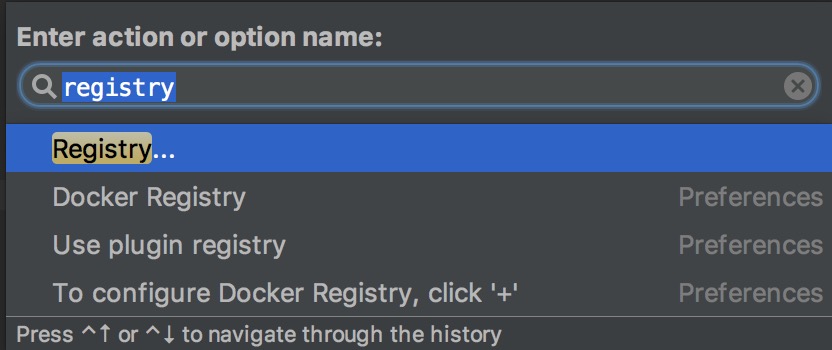
intellij > Help > find action > registry 검색

compiler.automake.allow.when.app.running 체크

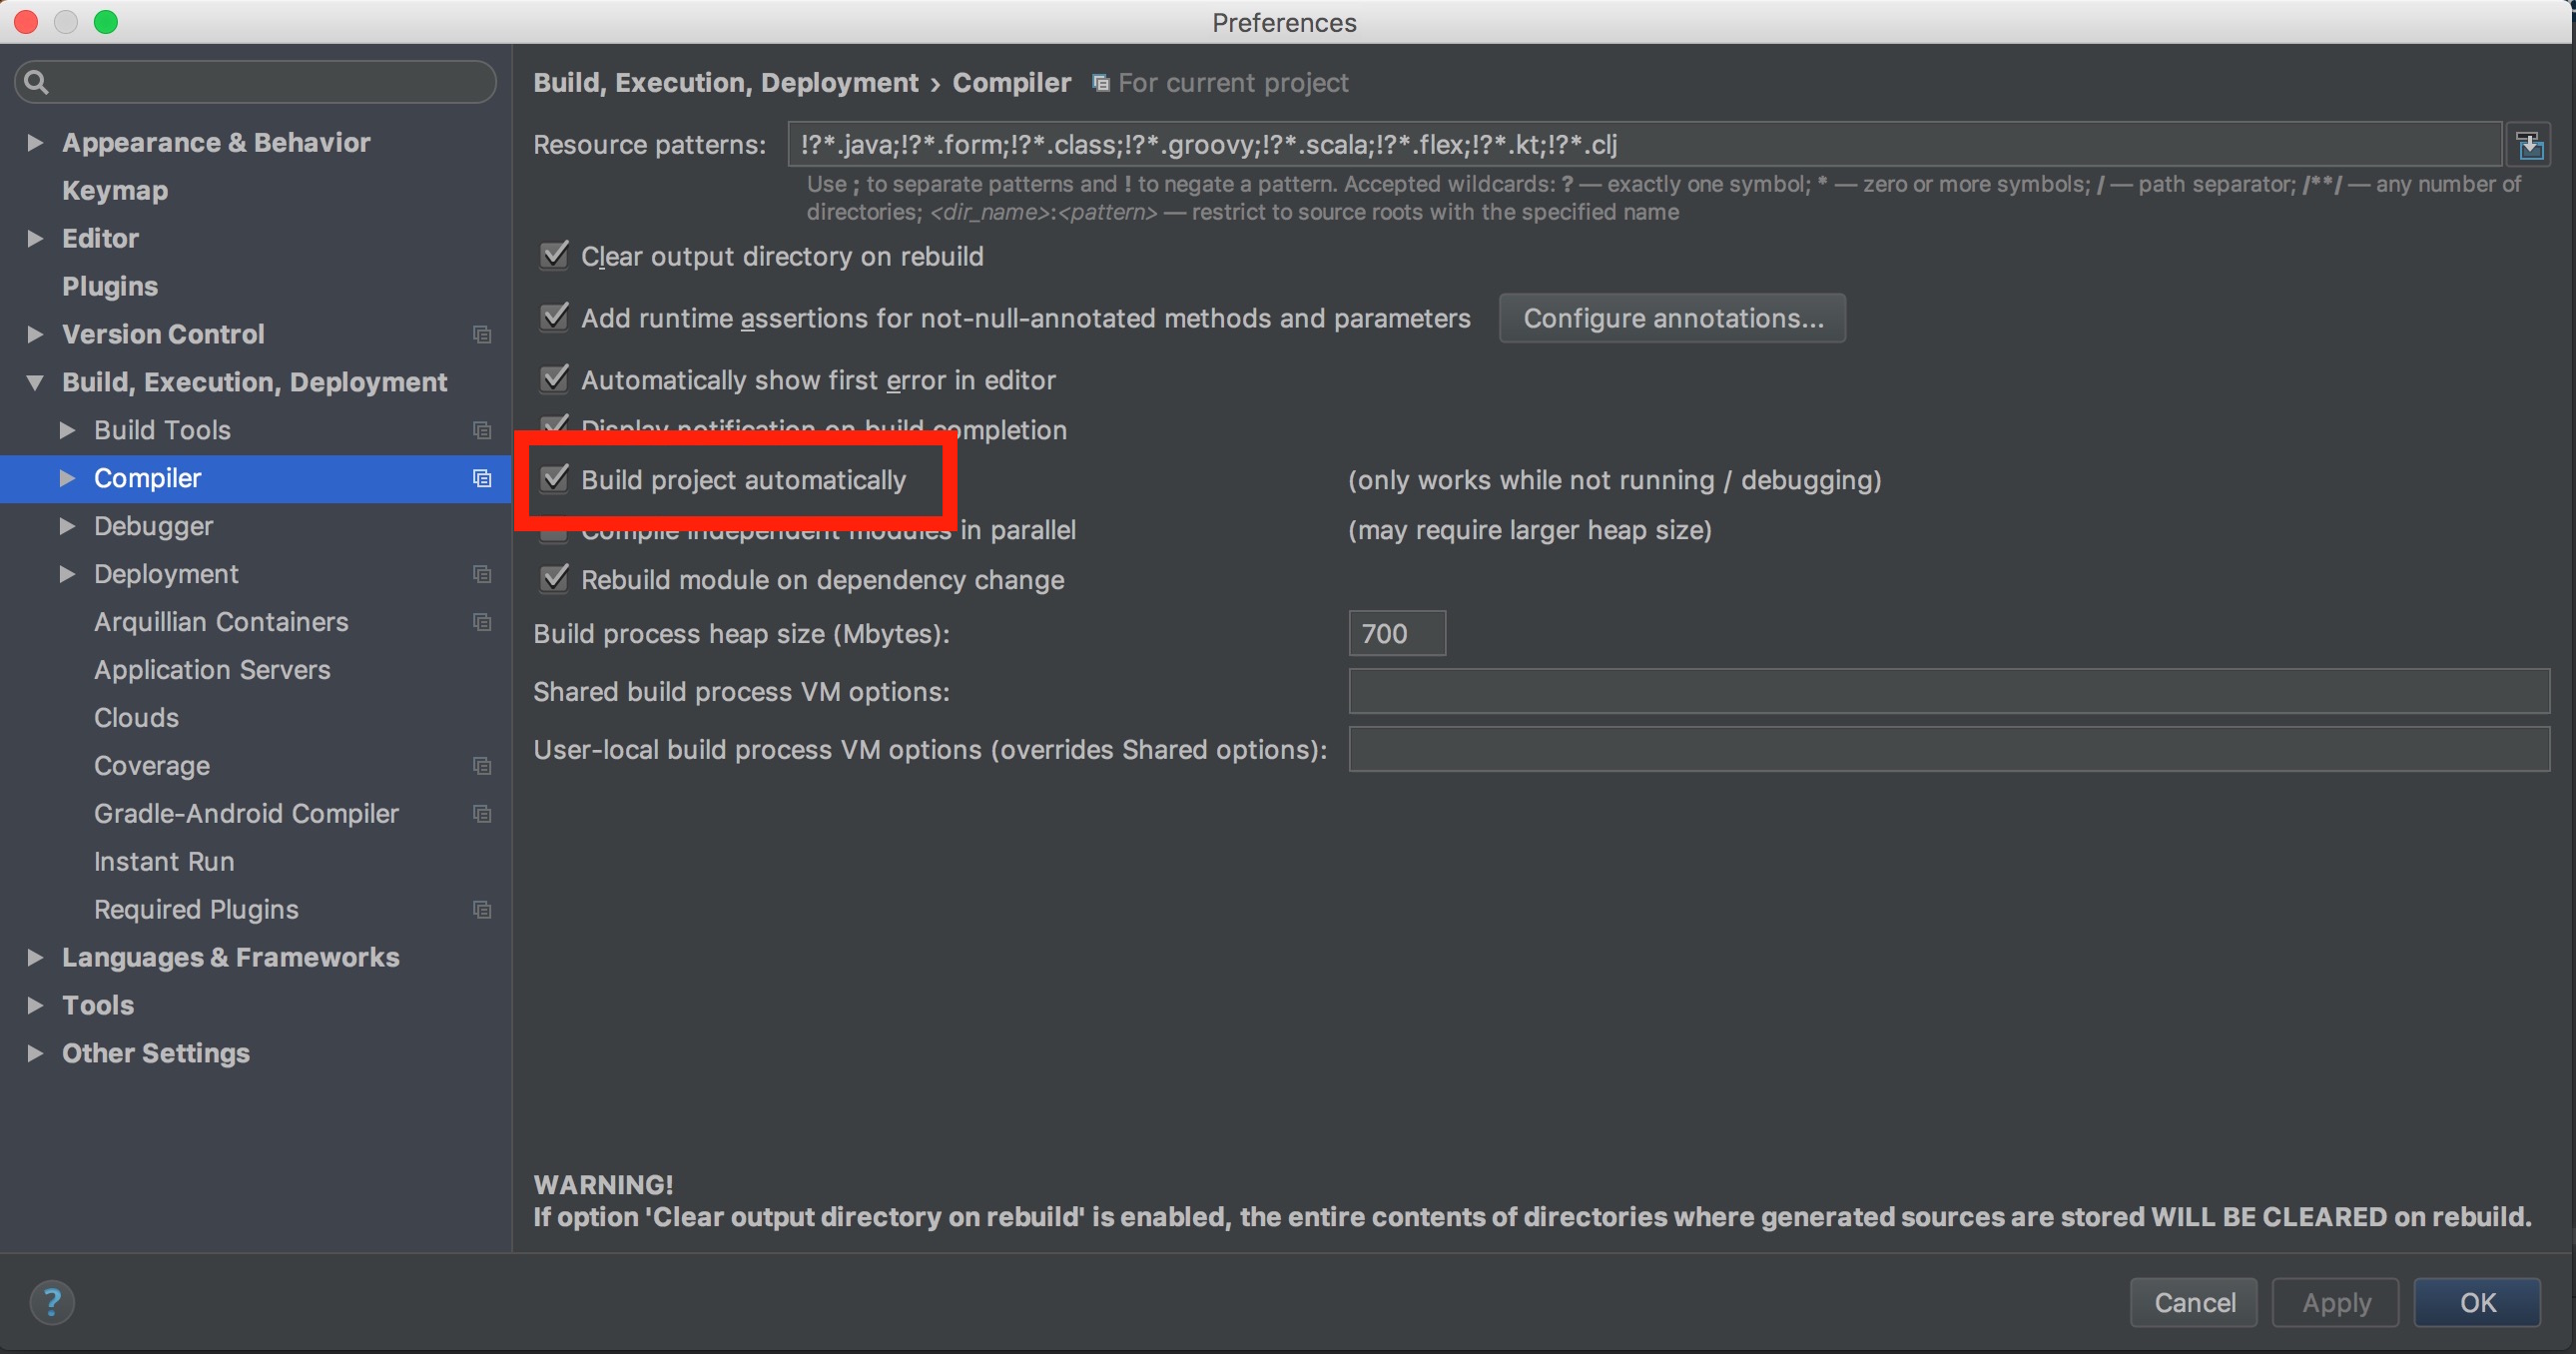
intellij > PreFerences > Build, Execution, Deployment > Compiler > Build proejct automatically 체크

상위까지 설정하고 서버 시작하면 그 이후에는 서버 재시작 없이 브라우저 새로고침만으로 view template 변경 적용되는 것을 확인 가능하다.

Posted in: Java, Programing, Talk Tagged: Handebars, JAVA, Spring boot, spring boot devtools

jenkins에서 maven build시 unmappable character for encoding ASCII 에러

2016년 7월 29일 by YongPwi Leave a Comment

jenkins 상에서 maven build 설정 중 error 발생,,,

maven 사용하여 build는 처음이라 삽질 좀 했다,,,

1. build file name
build file name에 버전 정보를 삭제하고 싶은 경우 하단 코드 참고

pom.xml에 설정해주면 된다.

1
2
3
4
5
6
7
<project xmlns="http://maven.apache.org/POM/4.0.0" xmlns:xsi="http://www.w3.org/2001/XMLSchema-instance"
        xsi:schemaLocation="http://maven.apache.org/POM/4.0.0 http://maven.apache.org/xsd/maven-4.0.0.xsd">
   <artifactId>yongpwi</artifactId>
   <build>
      <finalName>${project.artifactId}</finalName>
   </build>
</project>

2. jenkins build시 unmappable character for encoding ASCII error

요건 좀 삽질 했는데,,,

역시나 찾아보니 답은 있음,,,

pom.xml plugin에 encoding 설정을 해주면 해결 가능!

1
2
3
4
5
6
7
8
9
<plugins>
   <plugin>
      <groupId>org.apache.maven.plugins</groupId>
      <artifactId>maven-compiler-plugin</artifactId>
      <configuration>
         <encoding>UTF-8</encoding>
      </configuration>
    </plugin>
</plugins>
Posted in: Java, Programing Tagged: JAVA, jenkins, maven

Object Oriented Programming SOLID

2016년 7월 7일 by YongPwi Leave a Comment

기초 공부를 생각하다 문뜩,,,

명확하게 모르는것 같아서 정리,,,

1. Single Responsibility Principle(단일 책임 원칙)

객체는 단 하나의 책임만 가져야 한다.

잘못된 예

1
2
3
4
5
6
7
8
9
10
11
12
13
14
15
16
17
18
19
class Text {
    String text;
    String author;
    int length;
 
    String getText() { ... }
    void setText(String s) { ... }
    String getAuthor() { ... }
    void setAuthor(String s) { ... }
    int getLength() { ... }
    void setLength(int k) { ... }
 
    /*methods that change the text*/
    void allLettersToUpperCase() { ... }
    void findSubTextAndDelete(String s) { ... }
 
    /*method for formatting output*/
    void printText() { ... }
}

Text class는 text를 출력하는 처리를 하고 있다. 하지만 출력 기능에 대한 변화가 이루어 지게 된다면 Text class는 계속하여 변경 되어야 한다.
Text class는 다른 역할을 하는 코드들과 결합 관계를 가지게 된다는 뜻
출력 기능을 제거하고 다른 class에서 해당 기능을 처리 하도록 하자.

수정 예

1
2
3
4
5
6
7
8
9
10
11
12
13
14
15
16
17
18
19
20
21
22
23
24
25
26
27
28
29
class Text {
    String text;
    String author;
    int length;
 
    String getText() { ... }
    void setText(String s) { ... }
    String getAuthor() { ... }
    void setAuthor(String s) { ... }
    int getLength() { ... }
    void setLength(int k) { ... }
 
    /*methods that change the text*/
    void allLettersToUpperCase() { ... }
    void findSubTextAndDelete(String s) { ... }
 
    /*method for formatting output*/
    void printText() { ... }
}

class Print {
    Text text;
 
    Printer(Text t) {
       this.text = t;
    }
 
    void printText() { ... }
}

2. Open / Closed(개방 폐쇠 원칙)

특정 클래스는 그 클래스를 수정하지 않으면서 확장(extension) 가능해야 한다

1
2
3
4
5
6
7
8
9
10
11
12
13
14
15
16
17
18
19
20
21
22
23
24
25
26
27
28
29
30
31
32
33
34
public class FacebookUser{
 
    public boolean isValidUser() {
        System.out.println("FacebookUser: valid user...");
        /*Logic to valid user*/
        return true;
    }
}

// UserRegisterManager class에 addUser(TwitterUser user) method가 추가될때 추가 되어야 하는 class
//public class TwitterUser{
//
//    public boolean isValidUser() {
//        System.out.println("FacebookUser: valid user...");
//        /*Logic to valid user*/
//        return true;
//    }
//}

public class UserRegisterManager {
 
    public void addUser (FacebookUser user) {
        if(user.isValidUser()) {
            System.out.println("UserRegisterManager: valid user.");
        }
    }

    // 추가 되는 method
    public void addUser (TwitterUser user) {
        if(user.isValidUser()) {
            System.out.println("UserRegisterManager: valid user.");
        }
    }
}

UserRegisterManager class에 addUser (TwitterUser user) method가 추가되어야 한다고 가정한다.
새로운 기능에 대한 지원을 추가하기 위해 클래스를 수정해야합니다. 사실, 우리는 우리가 ClaimApprovalManager 클래스를 수정 할 때 이미 쓴 첫 번째 인스턴스에 개방 폐쇄 원칙을 위반했다. 변화가 많은 시스템일 경우 변경에 주의를 기울어야 할 부분이 많아진다.
응용 프로그램이 취약하고 확장하는 비용 발생하며 오류가 발생할 확률이 높아진다.

1
2
3
4
5
6
7
8
9
10
11
12
13
14
15
16
17
18
19
20
21
22
23
24
25
26
27
28
29
30
public abstract class User {
    public abstract boolean isValidUser();
}

public class FacebookUser extends User{
    public boolean isValidUser(){
        System.out.println("FacebookUser: valid user...");
        /*Logic to valid user*/
        return true;
    }
 
}

public class TwitterUser extends User{
    public boolean isValidUser(){
        System.out.println("TwitterUser: valid user...");
        /*Logic to valid user*/
        return true;
    }
 
}

public class UserRegisterManager {
    public void processClaim(User user){
        if(user.isValidUser()){
            System.out.println("UserRegisterManager: valid user");
        }
    }
 
}

3. 리스코프 치환 원칙(Liskov Substitution Principle)

서브타입은 언제나 자신이 기반타입 (base type)으로 교체할 수 있어야 한다.

LSP란 상위형 P가 있고 이걸 확장하는 하위형 C가 있을 때 P를 C로 치환할 수 있어야 한다 는 말이다.

1
2
3
4
5
6
7
8
9
10
11
12
13
14
15
16
17
18
19
20
class TransportationDevice {
   String name;
   String getName() { ... }
   void setName(String n) { ... }
 
   double speed;
   double getSpeed() { ... }
   void setSpeed(double d) { ... }
   
   Engine engine;
   Engine getEngine() { ... }
   void setEngine(Engine e) { ... }
 
   void startEngine() { ... }
}

class Car extends TransportationDevice {
   @Override
   void startEngine() { ... }
}

상위 코드는 문제가 없다. 자동차는 확실히 운송장치이며, 여기에 우리는 슈퍼 클래스의 startEngine() method를 override 하였다.

다른 운송장치를 추가 해보도록 하자.

1
2
3
4
class Bicycle extends TransportationDevice {
   @Override
   void startEngine() /*problem!*/
}

추가한 운송장치를 보면 자전거는 엔진을 가지고 있지 않으며 엔진을 시작 할 수 없다.

수정을 해보자.

1
2
3
4
5
6
7
8
9
10
11
12
13
14
15
16
17
18
19
20
21
22
23
24
25
26
27
28
29
30
31
32
33
class TransportationDevice {
   String name;
   String getName() { ... }
   void setName(String n) { ... }
 
   double speed;
   double getSpeed() { ... }
   void setSpeed(double d) { ... }

   //engine 관련 정보 삭제
}

class DevicesWithoutEngines extends TransportationDevice {  
   void startMoving() { ... }
}

class DevicesWithEngines extends TransportationDevice {  
   Engine engine;
   Engine getEngine() { ... }
   void setEngine(Engine e) { ... }
 
   void startEngine() { ... }
}

class Car extends DevicesWithEngines {
   @Override
   void startEngine() { ... }
}

class Bicycle extends DevicesWithoutEngines {
   @Override
   void startMoving() { ... }
}

4.Interface Segregation Principle(인터페이스 분리 원칙)
client는 자신이 사용하는 interface의 변경으로 자신을 변경하는 것은 용납하지만 자신과 관련되지 않는 interface의 변화로 인해 자신이 변하는 것은 용납해서는 안된다.
하나의 일반적인 interface 보다 구체적인 여러 개의 Interface가 낫다.

1
2
3
4
5
6
7
8
9
10
11
12
13
14
15
16
17
18
19
20
21
22
23
24
25
26
public interface Toy {
    void setPrice(double price);
    void setColor(String color);
    void move();
    void fly();
}

public class ToyHouse implements Toy {
    double price;
    String color;
   
    @Override
    public void setPrice(double price) {
        this.price = price;
    }
   
    @Override
    public void setColor(String color) {
        this.color=color;
    }
   
    @Override
    public void move(){}
    @Override
    public void fly(){}    
}

상위 코드를 보면 Toy interface를 상속받은 ToyHouse는 move(), fly() methode를 사용하지 않아도 구현해야만 한다.
이러한 위반은 코드의 가독성과 개발자를 혼란스럽게 한다.

1
2
3
4
5
6
7
8
9
10
11
12
13
public interface Toy {
     void setPrice(double price);
     void setColor(String color);
}

// interface를 작게 분리한다.
public interface Movable {
    void move();
}

public interface Flyable {
    void fly();
}

인터페이스를 작게 분리 하였으면 각 필요한 class의 기능들을 구현한다.

1
2
3
4
5
6
7
8
9
10
11
12
13
14
15
16
17
18
19
public class ToyHouse implements Toy {
    double price;
    String color;
 
    @Override
    public void setPrice(double price) {
 
        this.price = price;
    }
    @Override
    public void setColor(String color) {
 
        this.color=color;
    }
    @Override
    public String toString(){
        return "ToyHouse: Toy house- Price: "+price+" Color: "+color;
    }
}
1
2
3
4
5
6
7
8
9
10
11
12
13
14
15
16
17
18
19
20
21
22
23
24
25
26
27
28
public class ToyPlane implements Toy, Movable, Flyable {
    double price;
    String color;
 
    @Override
    public void setPrice(double price) {
        this.price = price;
    }
 
    @Override
    public void setColor(String color) {
        this.color=color;
    }
    @Override
    public void move(){
 
        System.out.println("ToyPlane: Start moving plane.");
    }
    @Override
    public void fly(){
 
        System.out.println("ToyPlane: Start flying plane.");
    }
    @Override
    public String toString(){
        return "ToyPlane: Moveable and flyable toy plane- Price: "+price+" Color: "+color;
    }
}
1
2
3
4
5
6
7
8
9
10
11
12
13
14
15
16
17
18
19
20
21
22
23
public class ToyBuilder {
    public static ToyHouse buildToyHouse(){
        ToyHouse toyHouse=new ToyHouse();
        toyHouse.setPrice(15.00);
        toyHouse.setColor("green");
        return toyHouse;
        }
    public static ToyCar buildToyCar(){
        ToyCar toyCar=new ToyCar();
        toyCar.setPrice(25.00);
        toyCar.setColor("red");
        toyCar.move();
        return toyCar;
    }
    public static ToyPlane buildToyPlane(){
        ToyPlane toyPlane=new ToyPlane();
        toyPlane.setPrice(125.00);
        toyPlane.setColor("white");
        toyPlane.move();
        toyPlane.fly();
        return toyPlane;
    }
}

5.Dependency Inversion Principle(의존 역전 원칙)

구현 클래스가 아닌 인터페이스 타입을 사용하라는 규칙이다.

1
2
3
4
5
6
7
8
9
10
11
12
13
14
15
16
17
18
19
20
21
22
23
24
25
26
27
28
29
30
31
public class LightBulb {
    public void turnOn() {
        System.out.println("LightBulb: Bulb turned on...");
    }
    public void turnOff() {
        System.out.println("LightBulb: Bulb turned off...");
    }
}

public class ElectricPowerSwitch {
    public LightBulb lightBulb;
    public boolean on;
    public ElectricPowerSwitch(LightBulb lightBulb) {
        this.lightBulb = lightBulb;
        this.on = false;
    }
    public boolean isOn() {
        return this.on;
    }
    public void press(){
        boolean checkOn = isOn();
        if (checkOn) {
            lightBulb.turnOff();
            this.on = false;
        } else {
            lightBulb.turnOn();
            this.on = true;
        }
 
    }
}

상위 코드에서 ElectricPowerSwitch class에 LightBulb class의 참조 필드를 사용하였다. ElectricPowerSwitch 생성자에서 lightBulb 객체를 생성하고 필드에 할당한다. 그 다음 ElectricPowerSwitch의 상태를 반환하는 isOn() method를 사용하였다. press() method에 state를 기준으로 turnOn() 및 turnOff() method를 호출한다.
상위 코드로 우리는 switch를 끄고 켤수 있다. 그러나 고레벨에 있는 ElectricPowerSwitch class는 저레벨의 LightBulb class를 직접 참조한다. 고레벨과 저레벨의 차이는 여러가지 일을 복합적으로 한다면 고레벨(ex:파일을 불러와 암호화 여부를 확인하고 backup 폴더에 저장하고 경로를 json으로 전달 해준다.), 저레벨은 단순한 기능만을 한다(ex:파일에서 바이트 데이터를 읽어온다.)

문제를 해결하기 위해서 인터페이스를 만들고 ElectricPowerSwitch, LightBulb classes를 구현한다.

1
2
3
4
5
6
7
8
9
public interface Switch {
    boolean isOn();
    void press();
}

public interface Switchable {
    void turnOn();
    void turnOff();
}
1
2
3
4
5
6
7
8
9
10
11
12
13
14
15
16
17
18
19
20
21
22
public class ElectricPowerSwitch implements Switch {
    public Switchable client;
    public boolean on;
    public ElectricPowerSwitch(Switchable client) {
        this.client = client;
        this.on = false;
    }
    public boolean isOn() {
        return this.on;
    }
   public void press(){
       boolean checkOn = isOn();
       if (checkOn) {
           client.turnOff();
           this.on = false;
       } else {
             client.turnOn();
             this.on = true;
       }
 
   }
}
1
2
3
4
5
6
7
8
9
10
11
public class LightBulb implements Switchable {
    @Override
    public void turnOn() {
        System.out.println("LightBulb: Bulb turned on...");
    }
 
    @Override
    public void turnOff() {
        System.out.println("LightBulb: Bulb turned off...");
    }
}
1
2
3
4
5
6
7
8
9
10
11
public class Fan implements Switchable {
    @Override
    public void turnOn() {
        System.out.println("Fan: Fan turned on...");
    }
 
    @Override
    public void turnOff() {
        System.out.println("Fan: Fan turned off...");
    }
}

Single Responsibility Prinsciple

Open / Closed

Liskov Substitution Principle

Interface Segregation Principle

Dependency Inversion Principle
Posted in: Java, Programing Tagged: JAVA, OOP, SOLID

IntelliJ Lombok cannot find symbol 컴파일 에러

2015년 9월 1일 by YongPwi 1 Comment

작업 중 코드상에서는 에러가 없는데,,,

컴파일 시에 Lombak 적용이 되지 않아서 꽤 삽질했는데,,,

역시나 구글링을 해보니,,,

내가 멍청해서 놓쳤던 부분이 있었다,,,

다음 삽질을 방지하기 위하여 정리!!

1
2
3
4
5
6
7
8
9
10
11
12
13
14
@Data
@Entity
public class User {
    @Id
    @Column(nullable = false)
    @GeneratedValue(strategy = GenerationType.AUTO)
    private Integer userId;

    @Column(length = 80, nullable = false, unique = true)
    private String userEmail;

    @Column(length = 255, nullable = false)
    private String userPass;
}

상위 처럼 되어 있는데도 컴파일 시에 에러가 난다,,,

스크린샷 2015-09-01 오전 11.08.42

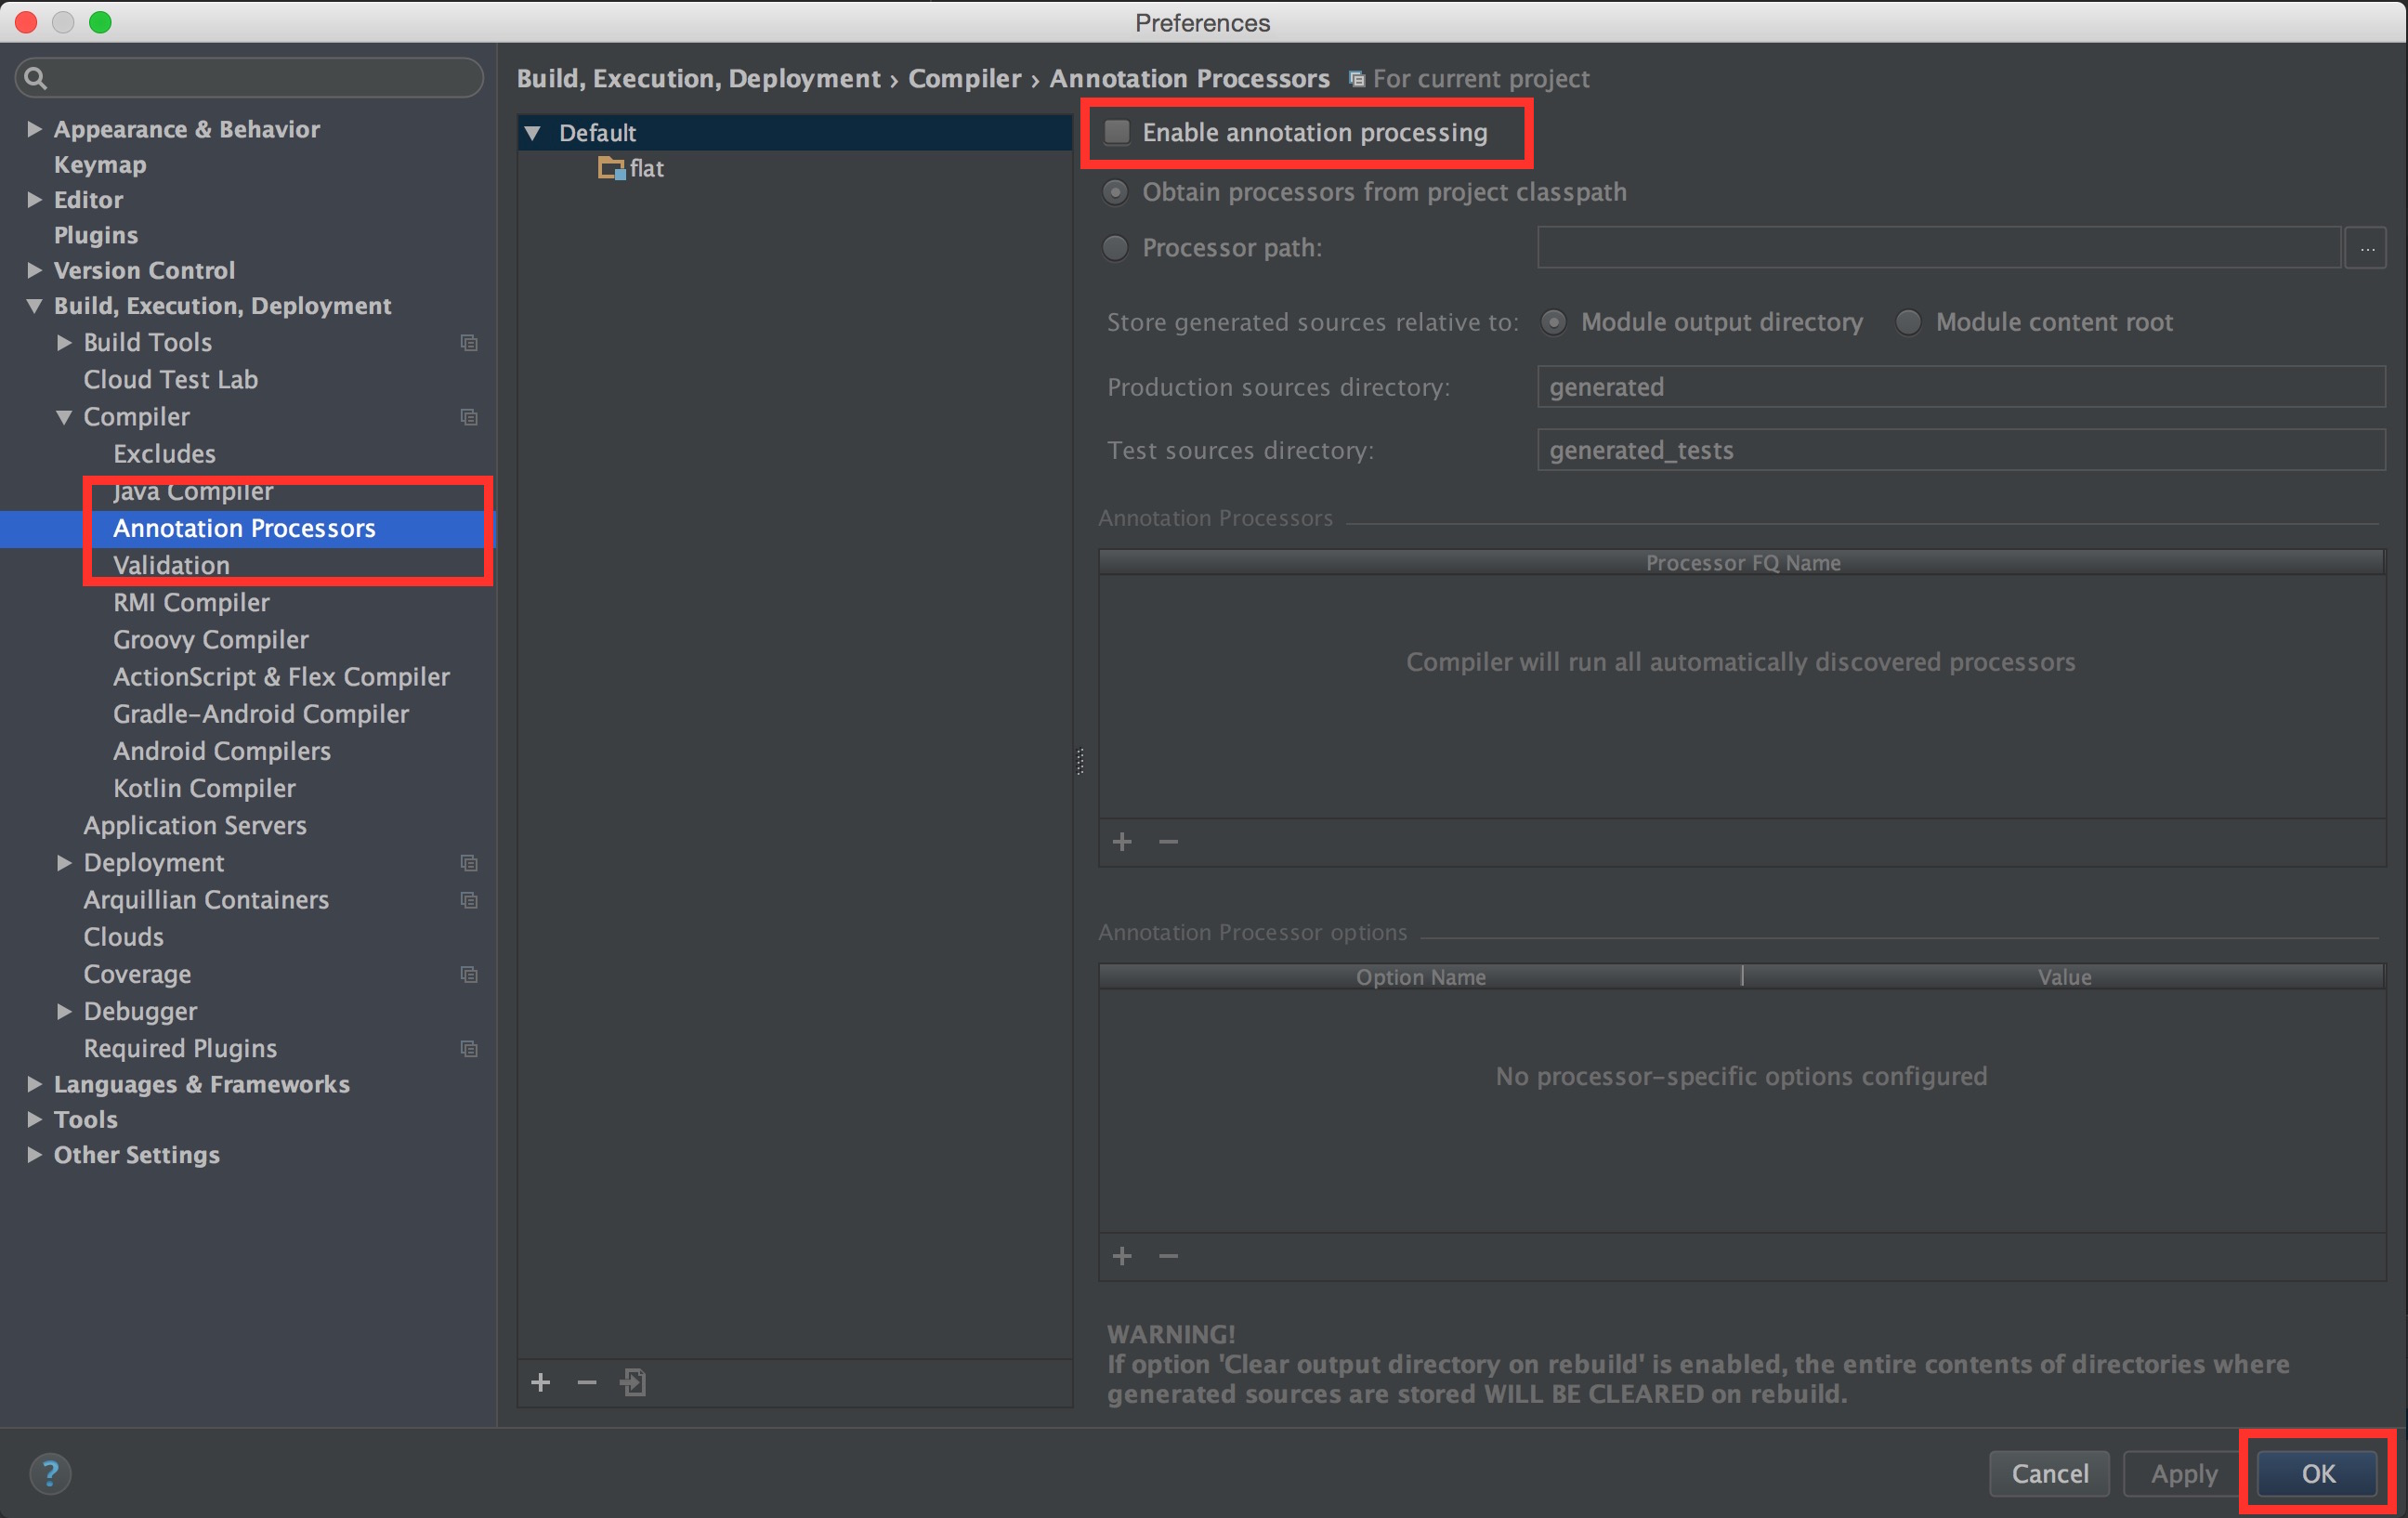
IntelliJ에 “Enable annotation processing”을 활성화 해주면 해결된다.

경로 (IntelliJ Preferences => Build, Excution, Deployment => Compiler => Annotation Processors)

스크린샷 2015-09-01 오전 11.10.51

Posted in: Java, Programing Tagged: IntelliJ, JAVA, Lombok

Factory Method 디자인 패턴

2015년 7월 7일 by YongPwi Leave a Comment
  • Template Method과 마찬가지로 상속을 통해 기능확장
  • 슈퍼클래스 코드에서는 서브클래스에서 구현할 메소드를 호출해서 필요한 타입의 오브젝트를 가져와 사용
  • 슈퍼클래스는 서브클래스가 어떤 클래스 오브젝트를 리턴할지 모름
  • 서브클래스는 다양한 방법으로 오브젝트 생성 메소드를 재정의
  • 서브클래스에서 오브젝트 생성 방법과 클래스를 결정할 수 있도록 미리 정의해둔 메소드 = Factory Method
1
2
3
4
5
6
7
8
9
10
11
12
13
14
15
16
17
18
19
20
21
22
23
24
25
26
27
28
29
30
31
32
33
34
// Book 클래스
public class Book {
    String title;
    String author;
    String price;

    public void print(){
        System.out.println("title = " + title);
        System.out.println("author = " + author);
        System.out.println("prive = " + price);
    }

    public String getTitle(){
        return title;
    }
}

// 여러가지 책
class ComicBook extends Book{
    public ComicBook(){
        this.title = "럭키짱";
        this.author = "김성모";
        this.price = "1000원";
    }
}

// 여러가지 책
class CookBook extends Book{
    public CookBook(){
        this.title = "한신포차";
        this.author = "백종원";
        this.price = "2000원";
    }
}
1
2
3
4
5
6
7
8
9
10
11
12
13
14
15
16
17
18
19
20
21
22
23
24
25
26
27
28
29
30
31
32
// Book 생성 클래스(추상클래스)
public abstract class BookStore {
    public BookStore(){

    }

    public Book orderBook(String type){
        Book book = createBook(type);
        book.print();
        return book;
    }

    abstract Book createBook(String type);
}

// 서브 클래스 실제 사용할 클래스 오브젝트 생성하여 리턴
class Yes24BookStore extends BookStore{

    @Override
    Book createBook(String type) {
        return new ComicBook();
    }
}

// 서브 클래스 실제 사용할 클래스 오브젝트 생성하여 리턴
class KangComBookStore extends BookStore{

    @Override
    Book createBook(String type) {
        return new CookBook();
    }
}
1
2
3
4
5
6
7
8
9
10
11
12
13
14
15
16
17
18
19
20
21
// 고객이 책 구매
public class UserOrder {
    public static void main( String[] args ) {
        BookStore yes24 = new Yes24BookStore();
        BookStore kangcom = new KangComBookStore();
        Book book = yes24.orderBook("bookType");
        System.out.println("yes24 order=" + book.getTitle());
        Book book2 = kangcom.orderBook("bookType");
        System.out.println("kangcom order=" + book2.getTitle());
    }
}

// 출력결과
title = 럭키짱
author = 김성모
prive = 1000원
yes24 order=럭키짱
title = 한신포차
author = 백종원
prive = 2000원
kangcom order=한신포차
Posted in: Java, Programing Tagged: Factory Method, JAVA, 디자인패턴

Template Method 디자인 패턴

2015년 7월 7일 by YongPwi Leave a Comment
  • 변하지 않는 기능은 슈퍼클래스에 생성하고 자주 변경되며 확장할 기능은 서브클래스에 만든다.
  • 슈퍼클래스에 추상 메소드 또는 오버라이드 가능한 메소드를 정의
  • 코드의 기본 알고리즘을 담고 있는 템플릿 메소드 생성
  • 서브클래스에서 추상 메소드 구현 또는 훅 메소드 오버라이드하여 기능 확장
1
2
3
4
5
6
7
8
9
10
11
12
13
14
15
abstract class Work {
    // 1. 추상 메소드 또는 오버라이드 가능한 메소드를 정의
    public void workFlow() {
        stepOne();
        stepTwo();
        stepThr();
        stepFor();
    }
    // 2. 일반적인 구현은 기본 클래스에 정의
    protected void stepOne() { System.out.println( "Work.stepOne" ); }
    // 3. 변경 또는 기능확장이 필요한 메소드는 추상 메소드로 선언
    abstract protected void stepTwo();
    abstract protected void stepThr();
    protected void stepFor() { System.out.println( "Work.stepFor" ); }
}
1
2
3
4
5
6
7
8
9
10
11
12
13
14
15
16
17
18
abstract class Teacher extends Work{
    // 4. 서브 클래스는 메소드 구현 또는 오버라이드하여 기능 확장
    // 1. 추상 메소드 또는 오버라이드 가능한 메소드를 정의
    protected void stepThr() {
        step3_1();
        step3_2();
        step3_3();
    }
    // 2. 일반적인 구현은 기본 클래스에 정의
    protected void step3_1() {
        System.out.println( "Teacher.step3_1" );
    }
    // 3. 변경 또는 기능확장이 필요한 메소드는 추상 메소드로 선언
    abstract protected void step3_2();
    protected void step3_3() {
        System.out.println( "Teacher.step3_3" );
    }
}
1
2
3
4
5
6
7
8
9
10
class MathTeacher extends Teacher {
    // 4. 서브 클래스는 메소드 구현 또는 오버라이드하여 기능 확장
    protected void stepTwo() { System.out.println( "MathTeacher   .stepTwo" ); }
    protected void step3_2() { System.out.println( "MathTeacher   .step3_2" ); }

    protected void stepFor() {
        System.out.println( "MathTeacher   .stepFor" );
        super.stepFor();
    }
}
1
2
3
4
5
6
7
8
9
10
11
12
13
14
15
class TemplateMethodDemo {
   public static void main( String[] args ) {
       Work work = new MathTeacher();
       work.workFlow();
   }
}

// 결과
Work.stepOne
MathTeacher   .stepTwo
Teacher.step3_1
MathTeacher   .step3_2
Teacher.step3_3
MathTeacher   .stepFor
Work.stepFor
Posted in: Java, Programing Tagged: JAVA, Template Method, 디자인패턴

JAVA 자식 클래스가 할 수 있는일

2014년 7월 12일 by YongPwi Leave a Comment

최근 자바 기본 서적 보면서 머리속으로는 이해되는데,,,

막상 글로 표현하기 힘든 내용들을 생각난김에 정리,,,


생성자

  • 자식 클래스의 생성자가 호출되면 자동으로 부모 클래스의 매개 변수가 없는 기본 생성자 호출 됨
  • 명시적으로 super()라고 지정가능
  • 부모 클래스의 생성자를 명시적으로 호출하려면 super() 사용

변수

  • 부모 클래스에 private로 선언된 변수를 제외한 모든 변수가 자신의 클래스에 선언된 것처럼 사용 가능
  • 부모 클래스에 선언된 변수와 동일한 이름을 가지는 변수를 선언 가능 하지만 이렇게 엎어 쓰는 것은 권장하지 않음
  • 부모 클래스에 선언되어 있지 않는 이름의 변수를 선언가능

메소드

  • 변수처럼 부모 클래스에 선언된 메소드들이 자신의 클래스에 선언된 것처럼 사용 가능
  • 부모 클래스에 선언된 메소드와 통일한 시그니쳐를 사용함으로써 메소드를 overriding 가능
  • 부모 클래스에 선언되어 있지 않은 이름의 새로운 메소드를 선언가능
Posted in: Java, Programing Tagged: JAVA

OS X에서 JDK7 사용할 때 한글 파일명 처리 오류

2014년 3월 28일 by YongPwi 1 Comment

OS X에서 간단하게 코딩 테스트중이었는데

파일에 대한 접근이 계속 에러가 나서 내가 무언가 잘못 해서 그런가 보다 하고

열심히 삽질을 했다,,,

아무리 해도 안 돼서 혹시 파일명이 한글인가 싶어서 파일명을 영어로 수정했더니,,,

잘된다,,,

아무래도 내 환경 문제인 것 같아서 열심히 구글링을 했는데 몇몇 포스트들이 있었다.

JDK6 까지는 이상 없는 것 같고 JDK7에서만 발생하는 문제인 것 같다.

“JDK 1.6까지는 이클립스를 실행 시킬 때 LC_CTYPE 를 정상적으로 지정하고 실행되는데
JDK 1.7에서는 LC_CTYPE를 지정하지 않고 이클립스가 실행됩니다.”

난 intelliJ라서 될까 해서 시도했는데 상관없이 정상적으로 동작했다.

하위 코드를 시스템 설정에 추가해준다.

1
2
3
4
sudo vi 본인사용자 경로/.bash_profile  // 해당 파일을 vi로 열어서 하위 명령어 추가

export LC_CTYPE=ko_KR.UTF-8
export _JAVA_OPTIONS=-Dfile.encoding=UTF-8
1
2
3
4
sudo vi /etc/launchd.conf  // 해당 파일을 vi로 열어서 하위 명령어 추가

setenv LC_CTYPE ko_KR.UTF-8
setenv _JAVA_OPTIONS -Dfile.encoding=UTF-8

상위 설정을 해주고 intelliJ 재시작 후 다시 실행하니 동작~!

Posted in: Java, Programing Tagged: JAVA, JDK7, OS X

Calendar

3월 2023
일 월 화 수 목 금 토
« 4월    
 1234
567891011
12131415161718
19202122232425
262728293031  

Recent Posts

  • ubuntu bastion 설정
  • Spring Boot properties 암호화
  • Git Repository Bitbucket과 Issue Tracker Redmine 연동 설정
  • Spring Security 동일 session 제어
  • Spring @Mock, @Mockbean, @InjectMock

Recent Comments

  • pzotov (Ubuntu 14.04에서 Sonarqube 6.7.1 service 등록)
  • cours de theatre paris (AWS ELB와 Auto Scaling 연동, nginx)
  • bayern munich (IntelliJ EAP Font rendering)
  • camiseta del chelsea (OS X에서 APP 아이콘 변경)
  • cheap football shirts replica (jQuery Ajax에서 json Array 직렬화)

Copyright © [the-year] [site-link].

Powered by [wp-link] and [theme-link].